:max_bytes(150000):strip_icc():format(jpeg)/simply-recipes-ina-garten-parm-crisps-lead-1-20e7502a3aa747e3aea78d733354680f.jpg)
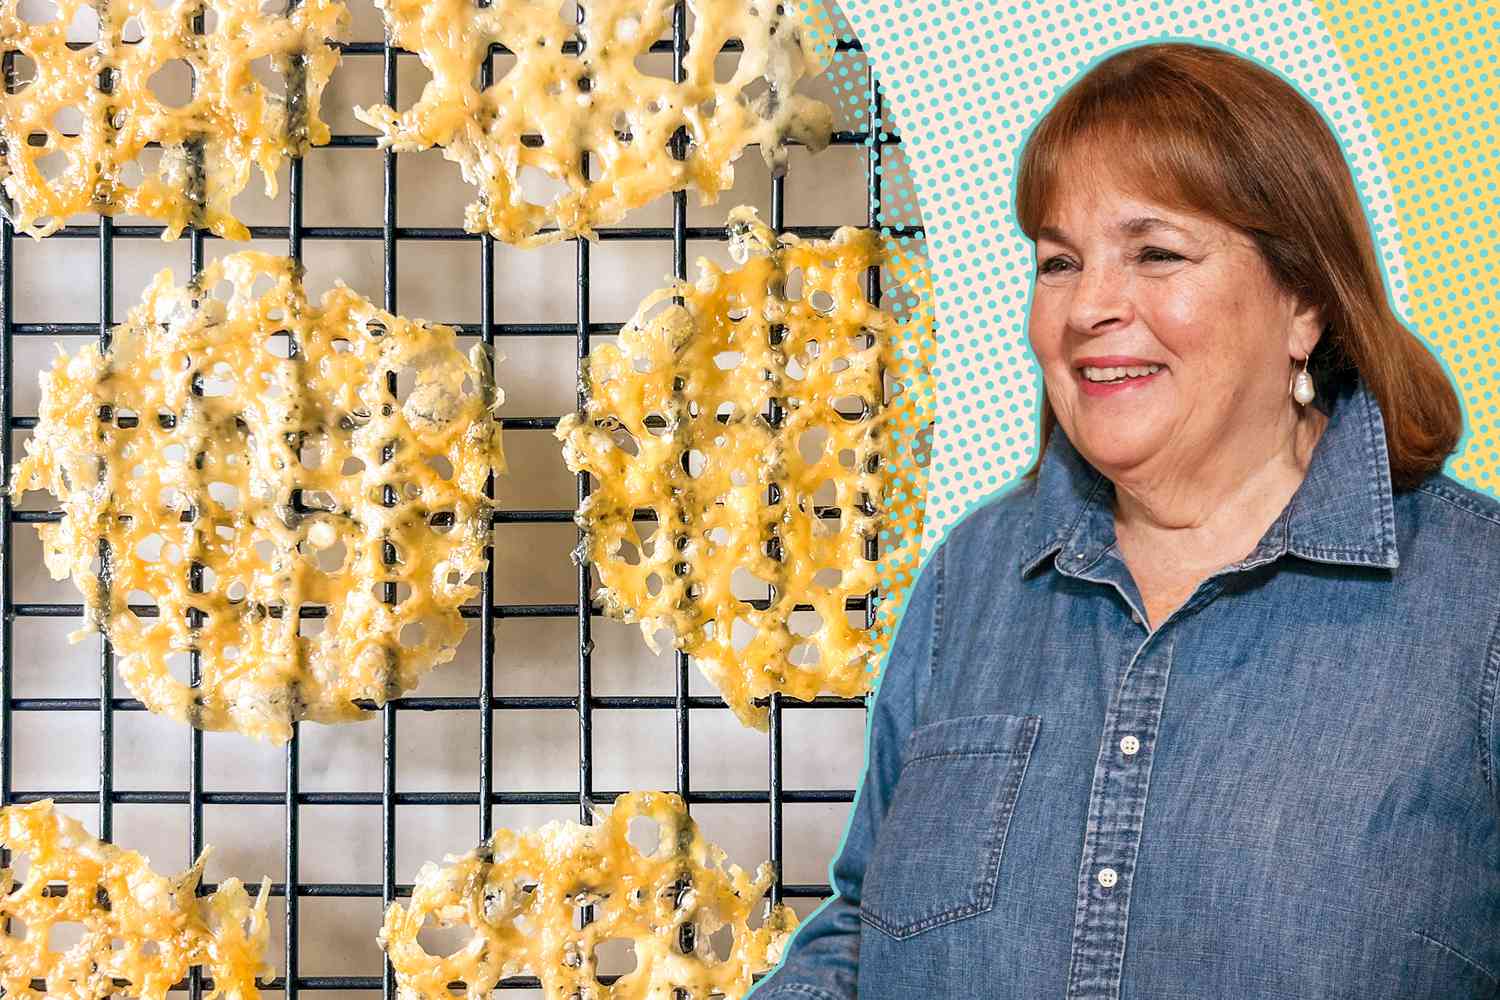
There are moments in life when you realize something simple fundamentally changes the game. For me, one of those moments happened at the grocery store. I’m a big fan of Whisps Cheese Crisps, crispy cracker-like rounds made simply from cheese.
Several years ago, as I was about to toss a bag into my cart, I thought, “I bet I could make these at home.” So, I left the Whisps on the shelf, typed “Parmesan crisps recipe” into my phone’s search bar, and discovered Ina Garten’s Parmesan Crisps recipe. The Barefoot Contessa came to the rescue, per usual, with a solution for my crunchy craving dilemma. And since then, I’ve never looked back.
I still occasionally pick up bags of Whisps (they’re really good!), but because I can make them at home in 15 minutes for a fraction of the cost, I now buy them a lot less!
Simply Recipes / Kris Osborne
Why I Love Ina Garten’s Parmesan Crisps
It’s one of those genius creations that feels indulgent, effortless, and fancy all at once, which is peak Ina Garten. I place little mounds of grated Parmesan onto a pan, and when they’re subjected to the magic of a hot oven, they transform into a crispy, salty, satisfying snack/fancy appetizer.
The result is always these crisp, lacy, nutty, and savory rounds. I love that they’re the kind of thing I’d find topping a Caesar salad at a fancy restaurant or served with cocktails at a bougie garden party, but I can whip them up in my oven.
They’re also quite versatile. Now and then, I’ll keep a container of them on my counter to toss into salads for an extra crunch, crumble onto soups like gourmet croutons, or serve alongside a glass of wine (often with some Goldfish crackers) when friends drop by.
They’re also delicious simply on their own as a satisfying, protein-rich snack. If you ever have a hunk of Parmesan drying out in the fridge, this recipe is wonderfully, gratifyingly waste-free.
Simply Recipes / Kris Osborne
Tips for Making Ina Garten’s Parmesan Crisps
While Ina’s original recipe from her book, Barefoot Contessa Foolproof, is a three-ingredient mixture of Parmesan, flour, fresh thyme, salt, and pepper, I often lean into the one-ingredient version for simplicity and lacier results. But I make both, depending on what I’m in the mood for!
- Grate your own cheese. This is my biggest piece of advice, and it’s a non-negotiable for success. Pre-grated cheeses often contain anti-caking agents, which prevent the cheese from melting properly and getting that gorgeous, lacy crispness we’re after. For these crisps, you need a fresh block of Parmesan (Parmigiano-Reggiano is ideal, but any good quality Parmesan will do) that you grate yourself right before baking.
- Use the two-grate method. Ina instructs you to use both the side of the box grater that finely grinds the cheese and the side that makes long shreds, then mix them. I think that’s because the finely grated cheese melts smoothly, creating a uniform base and that signature airy, crispy character, while the longer strands hold everything together and add structure.
- Don’t crowd the pan. These little beauties spread slightly as they bake, so give each rounded mound plenty of breathing room on the parchment-lined sheet pan (and on that note, don’t skip the parchment). If they touch, they’ll fuse, and, I say this from experience, you’ll have a hard time removing them cleanly.
- Watch the bake time. We all know that everybody’s ovens can be different. I need to bake them a bit longer in my oven, usually around 7 to 8 minutes, but always check around the 5-minute mark to be sure. They’ll continue to crisp up as they cool. Once they’re out, let them cool on the pan for a minute or two to set. Once they’re firm, I like to transfer them onto a sheet of paper towel to absorb any excess oil.
- Your pan matters. You’re looking for crisps with a light golden hue, and you’ll get that with a dark pan (and, of course, the parchment). When I’ve made them on a cream-colored pan, they take much longer to brown.
- Store them smartly. Keep them in an airtight container with a paper towel at the bottom to absorb moisture. While they won’t stay perfectly crispy, they’ll retain a good chewy texture and keep this way for about a week.

Leave a Reply